Screencasting with Screenpal
Getting started with screencasting doesn't need to be difficult. If you need to create resources for the Flipped Classroom, you can do it on your own computer.
Screenpal will be phased out in the beginning of 2026. We advice users to turn to other screencasting tools offered at KI.

Screenpal is a simple tool for creating screen recordings and voice overs as well as screenshot images. You can either upload the resulting video files directly the Canvas via 'My Media', or host them on an external video service such as KI play or Screenpal's own hosting site.
Use KI's campus license
Make sure you log into KI's version of Screenpal, to take advantage of the pro-video tools, as well as being able to record more than the 15 minutes the free version offers you.
Log in
- Go to: screenpal.com/karolinska_institutet. Use your KI credentials.
If you do not have a KI-ID or have problems logging in, please contact via the contact form for digital teaching and learning.
Record directly in browser
You do not need to download the client (as before). You record directly in your browser using a launcher (plug-in program). Choose to allow this by clicking 'Allow' if the question pops up.
If you have already installed the program, we recommend that you uninstall the previous version.
Content
- Once you have logged in you will land on the start page with your Content.
- Under Content, you can find videos, images or folders where you have saved content to Screenpal's hosting site.
Once you have logged in
When you are logged in, you will see your initials on the right side of the startpage. You will also find your profile and guides for the program.
The next time you log in, you will see all the content you created and saved via Screenpal's web service in "Content".
Get started
From the startpage, select whether you want to:
- take a screenshot
- create a recording
- open the video editor
When you click on one of the options for the first time after logging in, a message about downloading the plugin will appear and then the program will open.
How does the web launcher work for Screenpal?
You do not need to download the client as previously (ie not from KI's Software Center), but you may need to uninstall your previous version before clicking one of the launchers above. You do not need administrative rights for your computer to launch these plugins.
- Clicking on one of the three options: Take a screenshot, Make a recording or Open the Video Editor will open a web launcher plugin. This may take a few minutes the first time (you will see a downloading message). Bear in mind that this applies even to the Video Editor that you previously opened locally on your computer.
- Videos that you have previously recorded with Screencast-O-Matic will also be available via the Video Editor via the browser. You will be able to launch the video from your latest recording via the start menu for your computer.
- Make sure that you have the correct path to the Screencast-O-Matic folder on you computer when you open the Video Editor. You will see this path in the top left-hand corner of the editor.
Where do I save my videos and images?
Once you have made a recording you can choose to either save it locally on your computer or you can upload to Screenpal. Please make sure that you have read the introduction above.
- If you are going to create closed captions and then use the videos in Canvas you should first save the video locally on your computer and then upload it to My Media in Canvas.
- If you are going to share the video with external users (ie not via Canvas) then you should save your video to KI Play.
- If you want to share a video with colleagues for review or quick share then we suggest you save your video to Screenpal hosting service. This will allow you to get a quick, unlisted link to share with others.
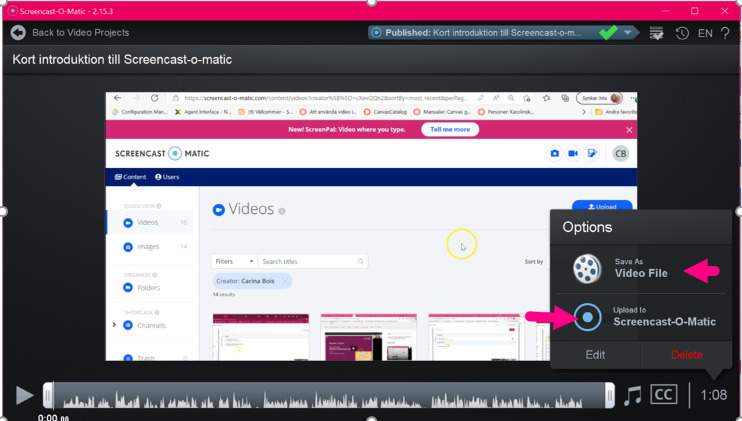
The image above shows how you choose between saving the video locally or uploading it to Screenpal.
To publish your video
It can be confusing to understand what "publish" means. If you are unfamiliar with saving your video files, then read the following explanation.
Save your recording as a video file (mp4)
If you are saving a video file to your computer then when you see Publish this will mean the publishing settings for saving your video file, for example, where the file is saved on your computer, what the name of the file is or which quality to select when publishing the video.
Video files are saved as MP4s. These video files can later be uploaded to Canvas via My Media or Media Gallery or uploaded to KI Play. from your computer, for example after you have edited the file or created captions.
Saving video files to a video hosting service
When you have made a recording in Screenpal you can also choose to save your video directly to Screenpal's hosting site. This will offer you other options for "publishing" your video.
For example: you can select a "Quick-share" option which will give you a direct link to your video without editing your file, hosted on Screenpal. You can choose Save/Upload to Screenpal with the option of editing the video first.
You can also use their video hosting feature to upload videos from your telephone or another device (IPhone or Android). This will give you access to videos across your devices. Download the app and give your KI e-mail when setting the app up. This will take your to the KI log in page. See tutorial for uploading videos to the hosting platform from other devices
Which option should you choose?
Generally, we recommend that videos you intend to use in a course in Canvas should first be saved (and edited) locally on your computer (or in a KI network) as as video file. This will also allow you the option of creating closed captions before you upload your video.
Once you have edited your video you save the file as an mp4 file. This file you then upload to either My Media or Media Gallery for your course, or upload to KI Play if you want to share the video with all users (not only your students). For example, videos for external distribution, such as research or KI events, can be saved on KI Play and shared publicly or via "unlisted" link.
Videos that you want to share quickly with colleagues for feedback, can be saved to Screenpal via Quick share but we do not recommend that you share videos with students in your course this way.
Screenpal's own guides
We recommend that you go to Screencast-o-matic's tutorial page for all their video guides and knowledge base articles.
Help - I can't see my previous videos
Remember that videos that you see on this start page are the videos you have uploaded to Screenpal's hosting service.
Screenpal app
You can use the Screenpal app (IPhone or Android) to capture or record content and share it with yourself.
Once logged into the app, make sure that you connect your phone with your account so that you can upload videos from your mobile to the Screenpal hosting site.
Accessible video
To make your recordings accessible for a wider group of viewers, we recommend that you create captions for your films. For tips on this, see Screenpal's support on adding captions.