Add content
To add content to your experiment you add new sections. In a section you can either upload different files, add text manually or link different projects and experiments to each other. For files, the maximum size that can be uploaded is 50 MB per file. All files that are uploaded or attached are automatically saved on the KI ELN server.
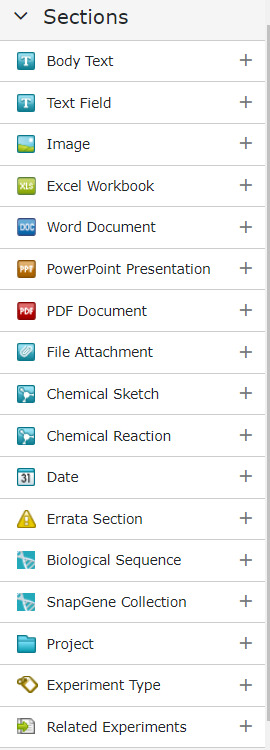
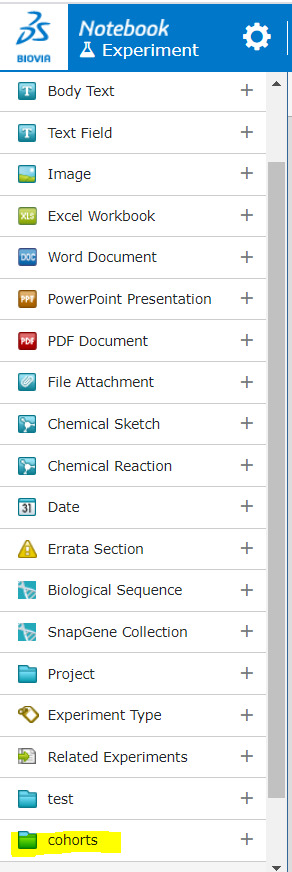
On the left panel of an experiment there is a menu of sections that can be added to the experiment.
When you add a new section, it will be placed at the bottom of the experiment/or after the section that is active.
You can easily move sections up and down by using the Arrows on the right side of each section.

Body text
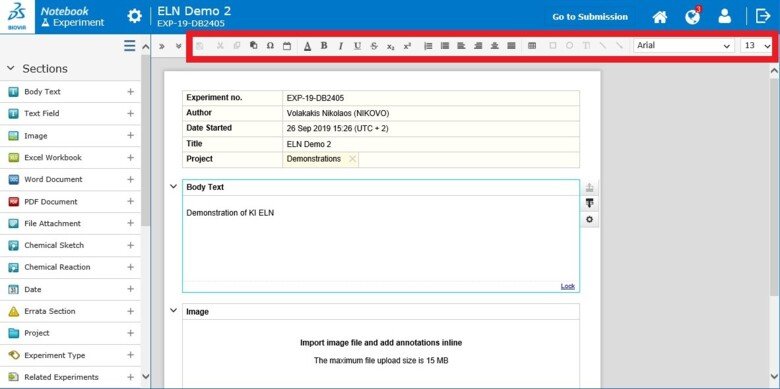
A blank “Body text” section where you can add text manually is automatically added to your experiment upon creation.
You can type text directly into the section or paste text from e.g. Microsoft Word (provided that the Biovia desktop connector is installed and connected to your browser).
You can use the menu on the top of the experiment page to edit your text

You can also include hyperlinks in a Body Text section.
To insert a hyperlink:
- In the Body Text section, select the text that you want to convert to a hyperlink.
- If you do not select text, the hyperlink will be placed at the insertion point, and its label will be the link target address.
- In the toolbar, click Link .
- In the Link URL box, type the target address, and click Save .
To edit a hyperlink:
- Click the hyperlink that you want to edit.
- In the callout box, click Edit link.
- In the Link URL box, edit the target address, and click Save.
To remove a hyperlink:
- Click the hyperlink that you want to remove.
- In the callout box, click Unlink .
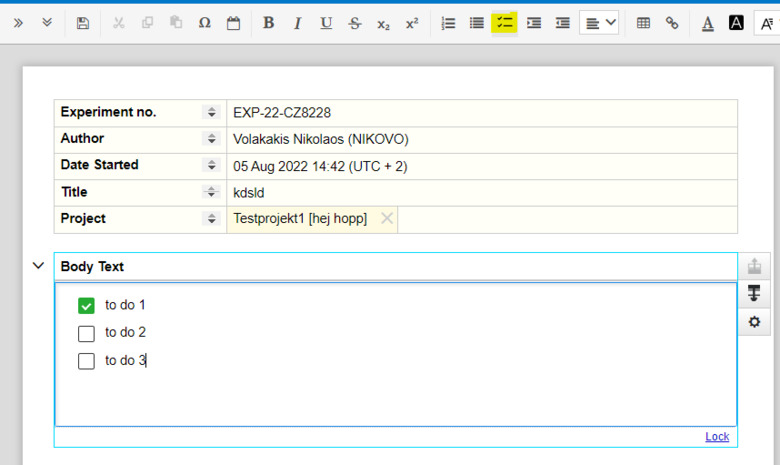
Apart from numbered and bulleted lists (for which there are respective icons in the body text menu) you can also create "to do" lists by clicking the respective button.
Enter the rows on the list on by one and when you have performed a task you can click on the box in front of it to mark it as completed.
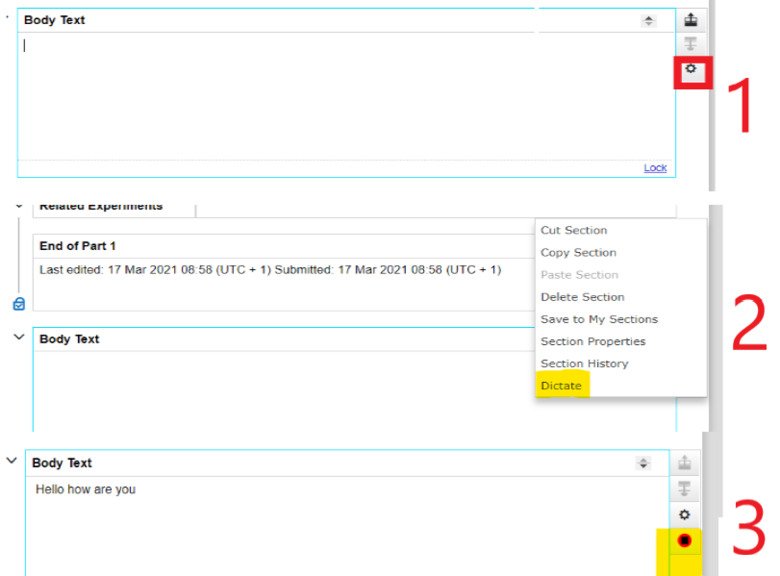
You can also dictate text into the section by clicking on the cogwheel and pressing "Dictate".
A red button will appear on the bottom right of the section, indicating that dictation is activated.
You can then speak into the microphone and speech will be converted into text.
When you are done dictating, press the red button to inactivate the dictation.
Dictation on Mac works only on Google Chrome.
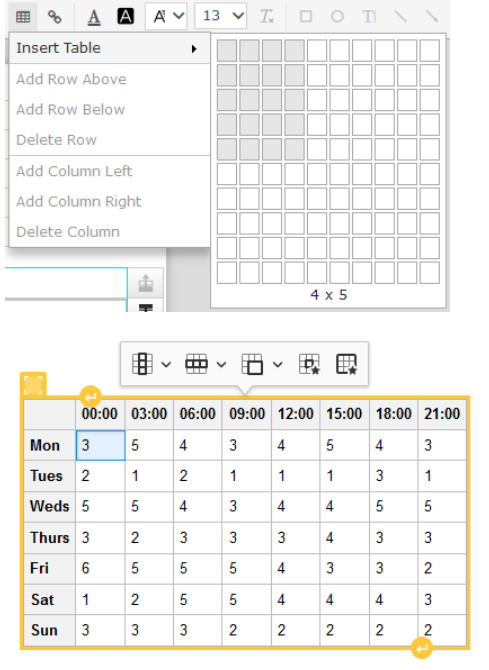
Using tables within a Body text section
Creating a Table
To insert a table into a Body Text section:
- Place the cursor in the Body Text section on an empty line where you require a table.
- Click the Table icon on the toolbar.
- Select Insert Table, and use the pointer to specify the number of rows and columns in the table.
- Enter text or data in your table, using formatting as you require.
Performing Column and Row Operations
You can perform various operations on whole columns and rows.
To perform column operations:
- Click any cell in the column for which you want to perform the operation, or select multiple columns.
- In the callout menu, click the Column icon.
- Perform the operation:
- To make the column a header column, select Header column.
- To insert an adjacent column, click Insert column left or Insert column right.
- To remove the column from the table, click Delete column.
- To select the whole column, click Select column.
- You can also add and delete columns using the Table menu on the toolbar.
To perform row operations:
- Click any cell in the row for which you want to perform the operation, or select multiple rows.
- In the callout menu, click the Row icon .
- Perform the operation:
- To make the row a header row, select Header row.
- To insert an adjacent row, click Insert row above or Insert row below.
- To remove the row from the table, click Delete row.
- To select the whole column, click Select column.
- You can also add and delete rows using the Table menu on the toolbar.
Merging and Splitting Cells
You can merge and split cells in a table.
To merge cells:
- Select the cells that you want to merge, and click Merge cells .
- Place the text cursor in one of the cells that you want to merge, click the arrow on the Merge cells tool, and select a merge operation from the menu:
- Merge cell up / right / down / left
To split cells:
- Place the text cursor in the cell that you want to split.
- Click the arrow on the Merge cells tool, and select a split operation from the menu:
- Split cell vertically / horizontally
Modifying Cell and Table Properties
You can modify the properties of individual cells, groups of cells, or the whole table.
To modify properties of a cell or cells:
- Place the text cursor in the cell whose properties you want to modify. If you want to modify the properties of multiple cells, select all the cells.
- Click the Cell properties icon .
- Edit the border, background, dimensions, and text alignment, as appropriate.
- Click Save .
To modify properties of the table:
- Place the text cursor in any cell.
- Click the Table properties icon.
- Edit the table's border, background, dimensions, and external alignment, as appropriate.
- Click Save .
Cutting, Copying, and Pasting Cells
You can cut, copy, and paste table cells.
As well as cutting, copying, and pasting cells within Notebook, you can cut, copy, and paste cells between Notebook and external applications. Compatible applications include Microsoft Word, Microsoft Excel, and web browsers.
To cut cells:
- Select the cells whose content you want to remove from the table.
- Use your browser's Cut command to cut the content, and to place the cells on the computer's clipboard.
- The cells are cleared, but they are not removed from the table.
To copy cells:
- Select the cells that you want to copy.
- Use your browser's Copy command to copy the cells to the computer's clipboard.
To paste cells:
- Cut or copy cells from a table in Notebook, or from another application.
- Place the text cursor where you want to insert the cells. This can be inside an existing table, or in the main body text, in which case a new table is created.
- Use your browser's Paste command to insert the cells.
Adding Paragraphs Before and After a Table
You can create extra space before and after a table by adding blank paragraphs.
To add paragraphs before and after a table:
- Hover the pointer anywhere in the table.
- A thick yellow border appears around the table.
- To add paragraphs before the table, click Insert paragraph before block .
- To add paragraphs before the table, click Insert paragraph after block .
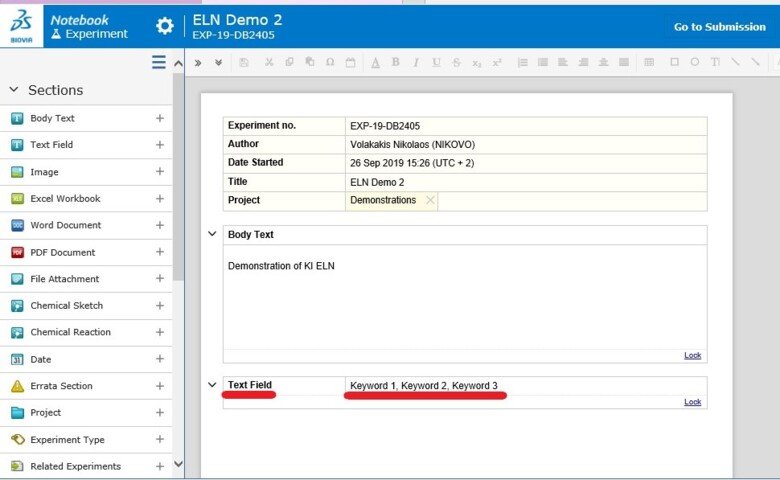
Text field
Here you can add text manually, not by uploading pre-existing documents.
This section can be used for example for keywords.
For longer text, use the Body text section.
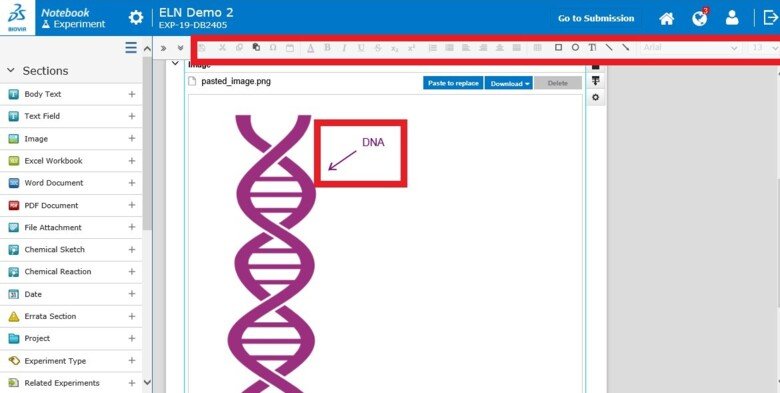
Image
Here you can attach images of the following formats: *.jpg, *.jpeg, *.gif, *.bnp, *.bmp and *.tiff.
If the images are larger than 50 MB, an image compression window will open so that the image can be compressed to save space in the database.
You can upload an image, paste it from the clipboard, drag and drop it into the section or use the screen capture function.
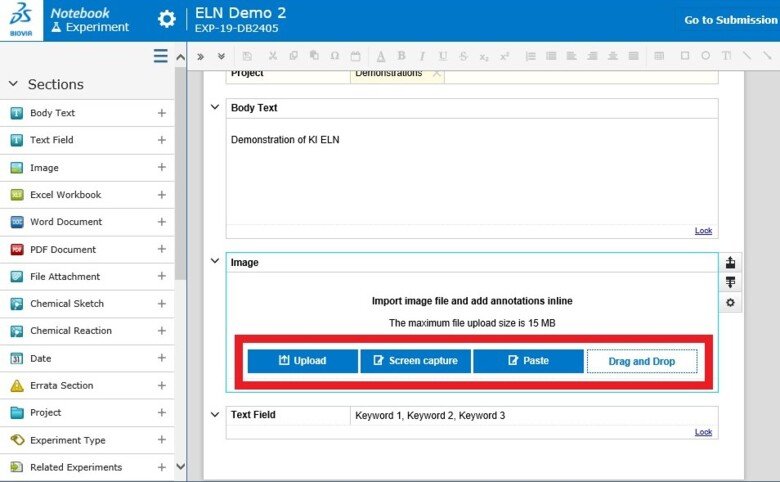
To add annotations, such as arrows or text you can use the annotation menu above the experiment page.
Here you can also change the color of the annotation to fit any background.
Excel Workbook
Here you can upload or drag and drop an existing Excel workbook or create a new one.
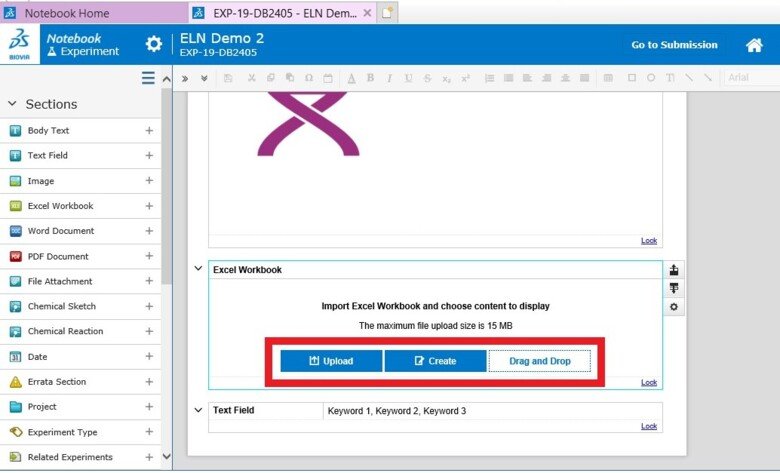
Microsoft Excel will open and load the existing or the new Excel Workbook that you can edit.
If you select cells, only the selected cells will show in the experiment.
If you want to insert all content of your spreadsheet to ELN, don’t select any cells.
When you have finished editing the Excel workbook, close it and it will be uploaded to the experiment.
- To re-open and re-edit an uploaded Excel workbook any time, double-click on the section or click “Edit” in the upper left corner of the section.
- To download the Excel workbook to your computer, click on “Download”.
- To delete the contents of the section, click on “Delete” in the upper left corner.
Word Document
Here you can upload or drag and drop an existing Word document or create a new one.
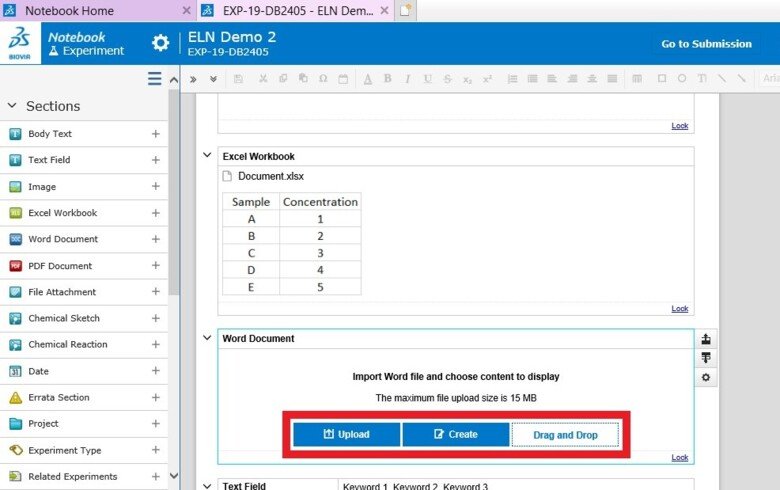
Microsoft Word will open and load the existing or the new Word document that you can edit.
When you have finished editing the Word document, close it and it will be uploaded to the experiment.
The whole page/pages will show in the experiment.
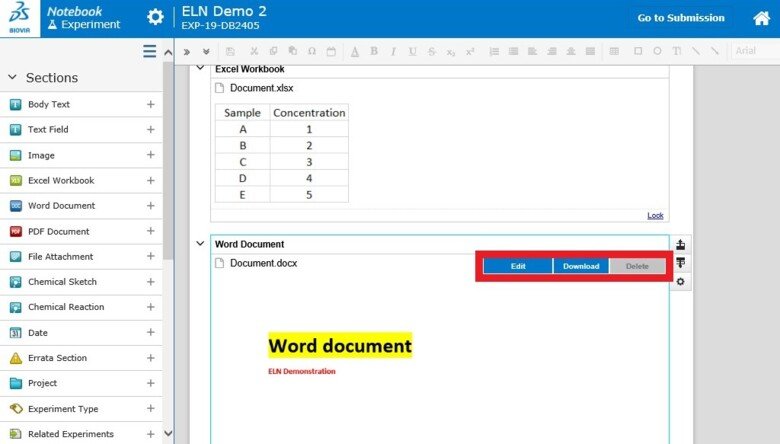
- To re-open and re-edit an uploaded Word document any time, double-click on the section or click “Edit” in the upper left corner of the section.
- To download the Word Document to your computer, click on “Download”.
- To delete the contents of the section, click on “Delete” in the upper left corner.
OBS: Old Word formats can not be opened on Windows 11. Please follow the following workaround to open them: KA-01563 · KI Self Service
Powerpoint presentation
Here you can upload or drag and drop an existing Poweroint presentation or create a new one.
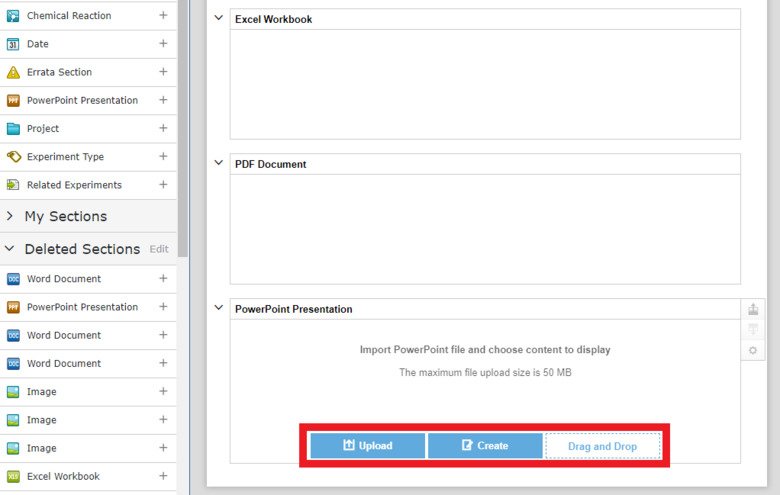
Microsoft Powerpoint will open and load the existing or the new Powerpoint presentation that you can edit.
When you have finished editing the Powerpoint presentation, close it and choose if you want to “Display All” or “Display selected” slides within ELN
The Powerpoint presentation will be uploaded to the experiment.
- To re-open and re-edit an uploaded Powerpoint presentation any time, double-click on the section or click “Edit” in the upper left corner of the section. When you have finished editing the Powerpoint presentation, close it and choose if you want to “Display All” or “Display selected” slides within ELN
- To download the Powerpoint presentation to your computer, click on “Download”.
- To delete the contents of the section, click on “Delete” in the upper left corner.
PDF document
Here you can upload or drag and drop a PDF document.
The first 10 pages will be displayed in the section.
File attachments
Here you can upload or drag and drop up to 14 documents per section.
Any file format is permitted, and the size limitation is 50 MB per file.
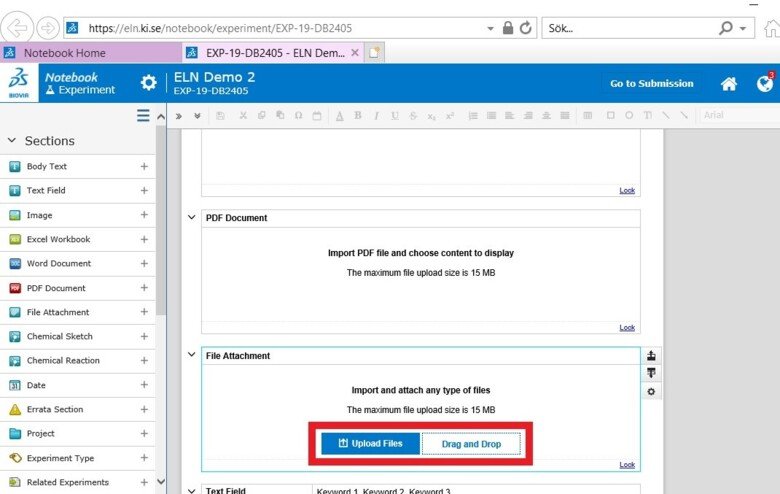
The contents of the files will not be shown in the experiment, but you will see a list with the filenames.
Uploaded files can be downloaded or deleted.

Chemical sketch and chemical reaction
These two sections are rarely used.
If you want to use them and are unsure, please contact elnkoordinator@ki.se.
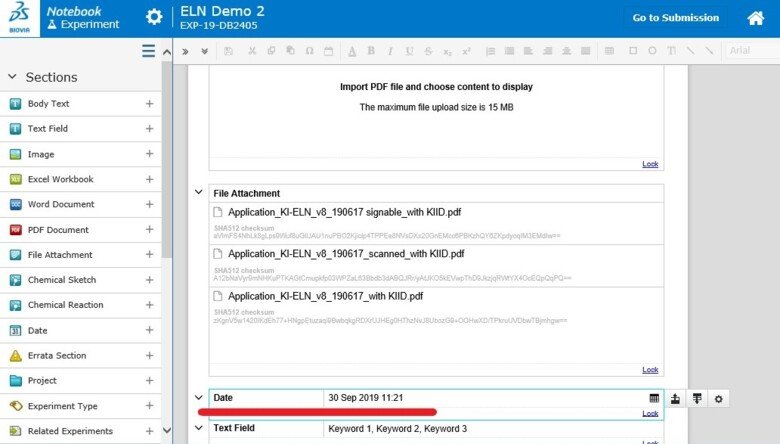
Date
Here you can add the current date to the experiment.
This section can be useful if the experiment spans over several days.
The date is automatically added to the experiment when it was created.
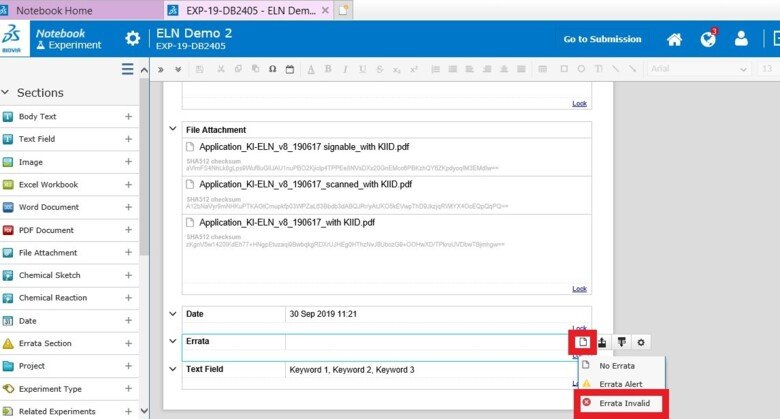
Errata
An Errata section can be added to notify mistakes in submitted experiments or locked sections.
Add an Errata section, click on the “paper” icon and choose “Errata Alert".
A sign with an exclamation mark will appear on top of the experiment that will notify you (and your coworkers) that there is a mistake within the experiment.
After adding an Errata section you can add a new section and upload for example a correct version of a document.
The errata can also be used to mark experiments as invalid.
After adding the Errata section, click on the “paper” icon and choose “Errata invalid”. Invalid experiments will not show up in a normal search.
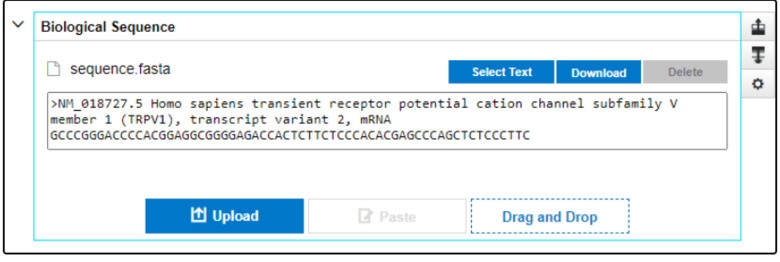
Biological sequence
You can use this section to store text and HTML files containing biological sequence data. You can also include annotated images (.jpg .jpeg .bmp .png .tiff .gif .emf)
Adding, Downloading, and Deleting Biological Sequence Items
To add an item:
Click anywhere in the Biological Sequence section
Do one of the following:
Click Upload.
- Navigate to and select a file or files in an appropriate text, HTML, or image format.
Biological Sequence sections support the following standard text formats also supported by GenBank, EMBL, and UniProt.:
.fa .faa .fasta .fsa .fna .frn .fastq .sanfastq .fq .sam .sto .stk .wig .bw .txt .sw .blastp .gb .embl .ent .text
However, you can upload any valid text file into a Biological Sequence section, if you select All Files (*.*) in the File Upload dialog box
- Click Open. Drop a file from Windows Explorer into the Biological Sequence section.
To download a Biological Sequence item as a file:
- Click anywhere in the Biological Sequence section.
- In the Biological Sequence section, click Download above the text, image, or HTML item.
- If the item is an image, select an option from the menu: Download displayed image, Download original image, or Download annotated image. For more information on downloading image data, see Image Section.
- Use your browser's options to choose whether to save the file, or to open it immediately.
To delete an item:
- Click anywhere in the Biological Sequence section.
- In the Biological Sequence section, click Delete above the text, image, or HTML item that you want to delete.
Selecting Text for Display
To make an experiment easier to read, you can abridge the visible text of Biological Sequence data. The whole data string remains available for searching.
To select Biological Sequence text for display in an experiment:
- Click Select Text above a text box in the Biological Sequence section.
- In the dialog box, do one of the following:
- Select the part of the text that you want to be visible in the experiment, and then click Display Selected.
- You can select multiple, non-contiguous parts of the text.
- To clear all selected text, click Clear Selection.
- If you want the whole text to be visible in the experiment, click Display All.
- Select the part of the text that you want to be visible in the experiment, and then click Display Selected.
The dialog box closes, and the section updates with your changes.
SnapGene Collection Section
You can use this section to store SnapGene collection files.
To create SnapGene Collection sections, you must have the following applications on your computer:
- SnapGene 6, with a valid license
- The BIOVIA Desktop connector
Each SnapGene Collection section contains one SnapGene collection, which in turn can contain .dna, .rna, .prot, and .clxn files.
Uploading an existing SnapGene collection:
- Click Upload inside the SnapGene collection section.
- Select a SnapGene .dna, .rna, .prot, or .clxn file and click Open.
- Alternatively, you can drop a SnapGene .dna, .rna, or .prot file from your computer into the SnapGene Collection section. (You cannot drop .clxn files.)
Creating a new SnapGene collection:
- Click Create inside the SnapGene collection section. SnapGene starts, with a new empty collection open.
- Import files into the collection, and edit the collection as appropriate.
- Close SnapGene.
- Notebook uploads the new collection into the SnapGene Collection section.
- When working with SnapGene and Notebook, do not open multiple instances of SnapGene at the same time. This causes import of SnapGene items into Notebook to fail.
Editing a SnapGene Collection
- Click Edit next to the name of the collection's .zip file inside the SnapGene Collection Section.
- The collection opens in SnapGene.
- Edit the collection in SnapGene.
- Close SnapGene.
- Your edits are transferred to the Notebook SnapGene Collection section.
- When working with SnapGene and Notebook, do not open multiple instances of SnapGene at the same time. This causes import of SnapGene items into Notebook to fail.
Downloading SnapGene Files
- Click Download next to the file name of the item in the SnapGene collection that you want to download. To download the whole collection, click Download next to the .zip file name at the top of the section.
- If the item is an image, select an option from the menu: Download displayed image or Download original image.
- Use your browser's options to choose whether to save the file, or to open it immediately.
Deleting SnapGene Files
- Click Delete next to the name of the SnapGene file that you want to delete.
- Click Yes to confirm the deletion
Selecting Text for Display within a SnapGene collaction section
- Click Select Text above a text box in the SnapGene Collection section.
- In the dialog box select the part of the text that you want to be visible in the experiment, and then click Display Selected. You can select multiple, non-contiguous parts of the text. To clear all selected text, click Clear Selection.
- If you want the whole text to be visible in the experiment, click Display All.
- The dialog box closes, and the section updates with your changes.
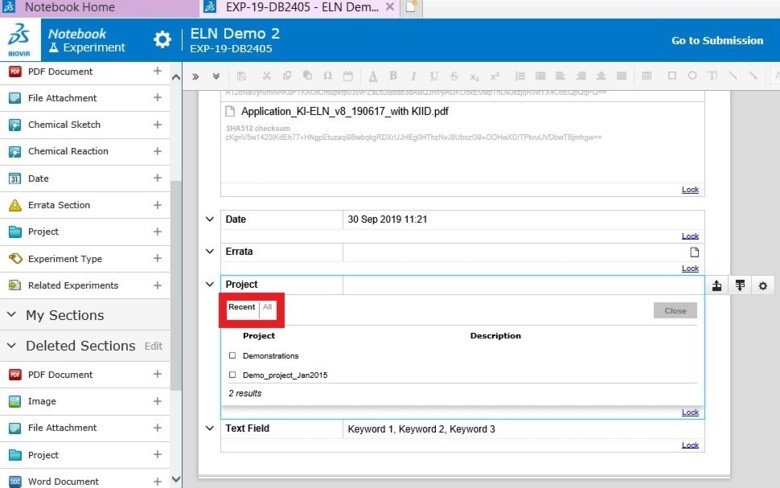
Project
By adding a Project section, you can link your experiment to a Project.
If you cannot see the project in the list, click “All” to see all available projects.
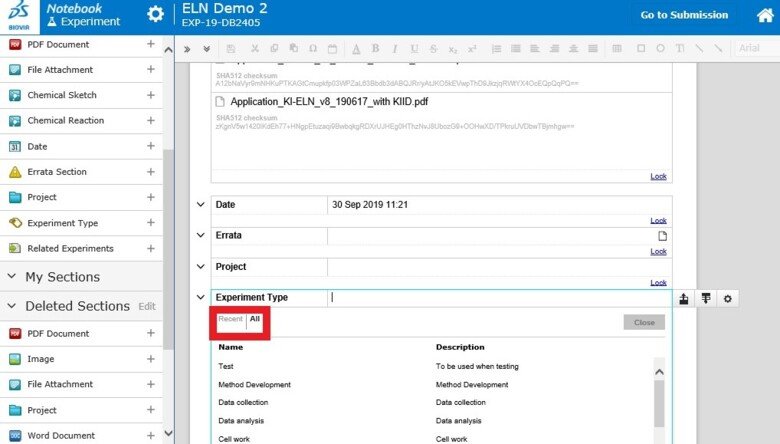
Experiments type
Here you can choose an experiment type for your experiment, from the types that have be defined by the superuser in the ElnAdminWeb.
Assigning types to experiments is a way to organize the experiments and make it easier to search for specific experiments and protocols.
If you cannot see the experiment type in the list, click “All” to see all available experiment types.
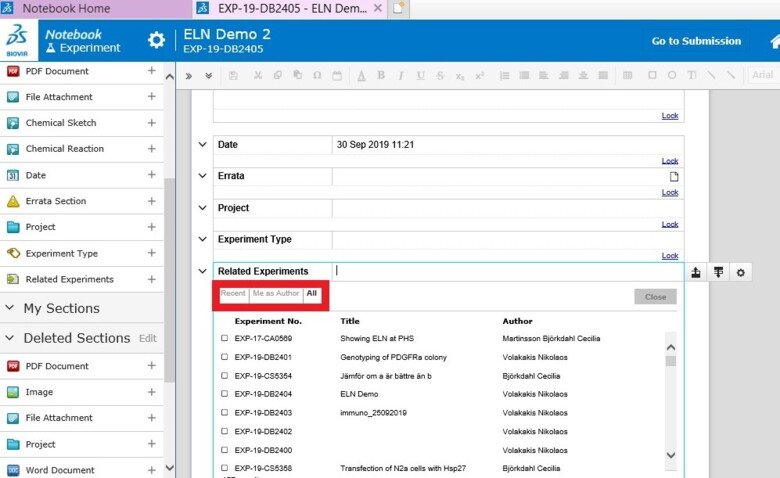
Related experiments
By adding a Related experiments section, you can link your experiment to another experiment if for example the two experiments share data.
If you cannot see the experiment in the list, click “All” to see all available experiments.
Lookup Sections
Lookup sections provide lists of terms that you can select to categorize experiments.
Lookup sections must first be created by the superuser. For instructions on how this is done see the dedicated lookup page.
For information on how you can search lookup section see https://staff.ki.se/search-experiments
Once a lookup section is created it appears under your “Sections” menu.
To add a lookup section:
- In the Sections list, click + for the lookup section type that you want to add.
Each lookup section type has its own name in the Sections list — for example, "Cohort”.
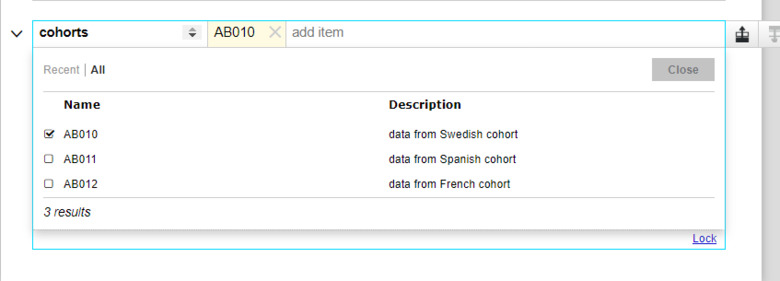
To add items to a lookup section:
- Click in the right panel of the section in the experiment.
- Select an item or items in the list.
- You can filter the list by typing the first few characters of items that you want to add.
- You can toggle between showing recently used items, and all items, by clicking Recent or All in the top left corner of the list.
- To close the list, click Close.
To delete an item in a lookup section:
- In the box for the item that you want to delete, click X.
My sections
Here you can add a section that you have previously created to your experiment.
To add a section to “My sections”, click on the cogwheel of a section and then “Save to My sections”.
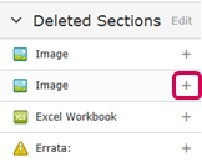
Deleted sections
Sections that you have previously deleted can be found under this tab.
To reinsert a deleted section to the experiment, select the section and clicking on the “+” sign.
To permanently remove deleted sections, click on “Edit”, select the sections you want to delete and click “Delete”.

Manage sections
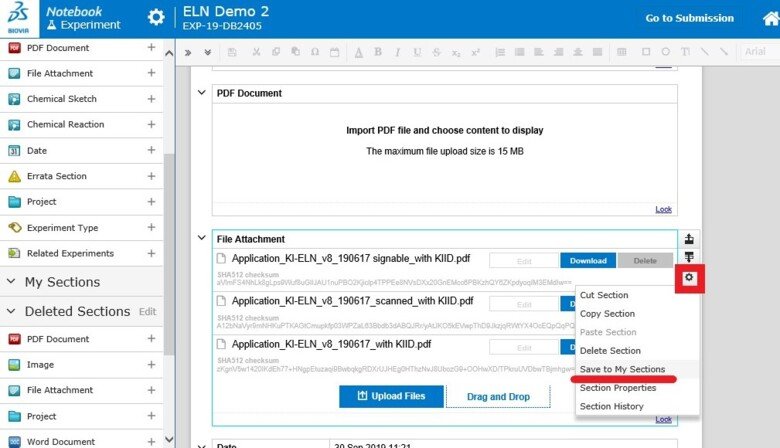
Each section can be managed under the cogwheel to the right.
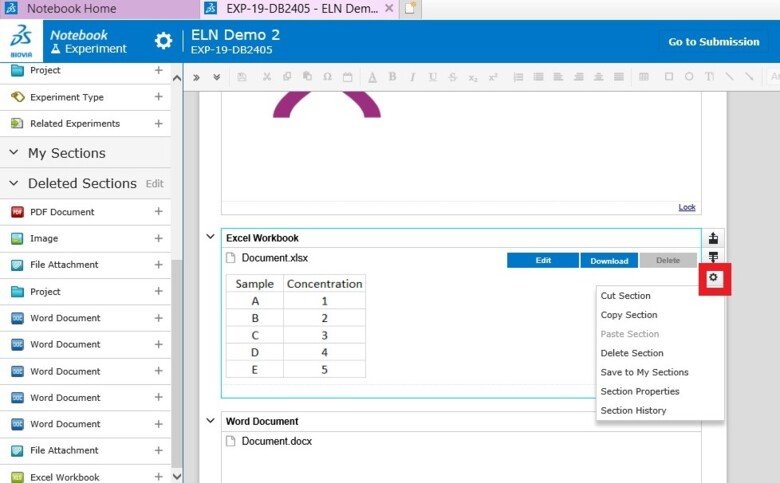
- Cut section – cuts out the whole section so that it can be pasted in the same experiment or in another experiment
- Copy section – a quick way to duplicate the same section within an experiment
- Paste section – paste a cut or copied section
- Delete section – deletes the section and adds it to “Deleted sections”
- Save to My sections – adds a section to “My sections”
- Section Properties – type of section, author, last created/edited and fixed/mandatory/read-only
- Section History – shows the last versions of the section
- Dictate (only for Body text sections)