Wordpress manual
Here is a manual on how to use Wordpress with KI templates. Below you find recommendations and instructions on how to manage websites and blogs in Wordpress, create and edit pages, blocks, blog articles and more.
How to order a blog in Wordpress at KI
At KI Wordpress is used as web platform for blogs - please visit this page and find out how to order a Wordpress blog at KI.
Wordpress templates at KI
The appearance of a Wordpress site is dependant on a template in which this website is build on. There are numerous templates offered for Wordpress sites. Karolinska Institutet uses two Wordpress templates: one template for blogs and one template for websites.
Get started with your Wordpress site
After you have ordered your Wordpress blog here and your request has been approved, you will receive login information for your new blog in an automatically generated email with a link to the editor's interface. The link needs to be activated within 24 hours, otherwise it will become inactive and you'll need to request it again. You must log in with your e-mail address and the temporary password that you find in the same email. You can change the password if you want, after logging in with that temporary password once.
After logging in, you will enter your editor's interface, or the dashboard.
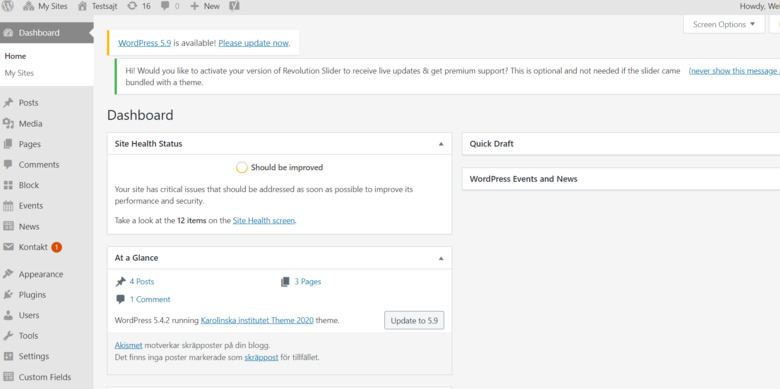
Dashboard and main theme settings
Your permissions on the site are determined by your role that was assigned to you by an administrator. To be able to edit the site, you need to get one of the following roles: administrator or author. After logging in, you come to the editor interface (dashboard). There you see a menu on the left with a list of options allowing you to edit your site.
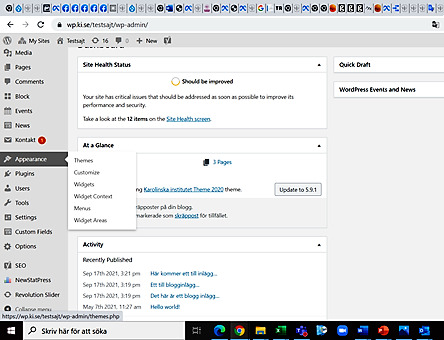
Appearance (only for admins)
This option menu is available only for those who has administrator access level. Appearance tab allows you to choose the basic theme settings. Under the Appearance tab, you find the settings for the template, widgets and website menu. With these settings you can change and adapt the overall look and structure of the website. For instance, you can set up the layout for the homepage, select or replace the main banner and customize the website theme.
When you click on Appearance in the dashboard menu on the left - a drop-down menu will open, consisting of the following options:
- Themes
- Customize
- Widgets
- Widget Context
- Menus
- Widget Areas
To be able to adjust the theme, the home page and the menus, click on Customize. A new page will open where you will see an additional tab menu with several options.
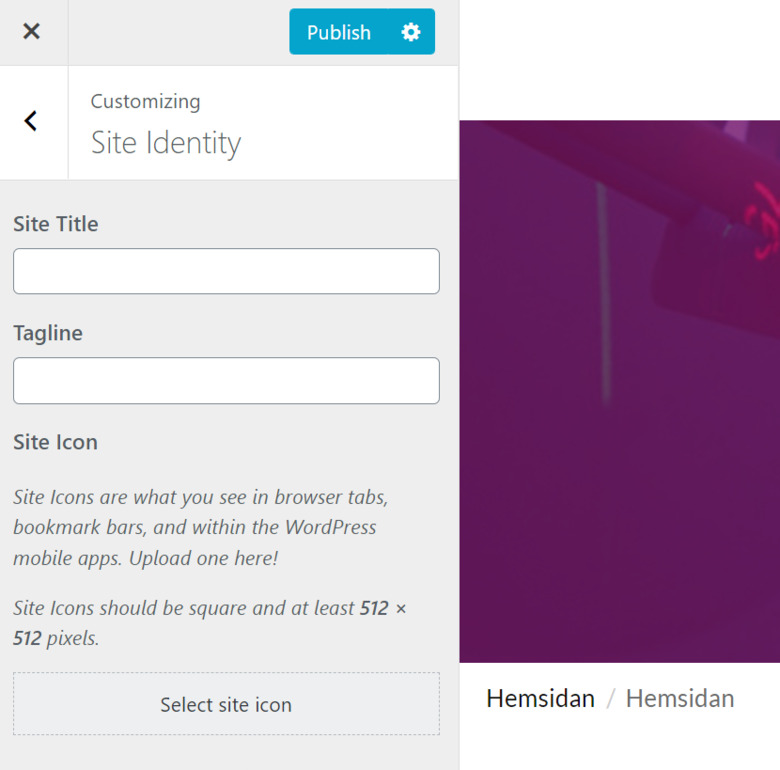
Site identity
The one on top is Site identity. Here you can set up the following options: Site title, tagline and your website icon (favicon).
Site Title is the site's name, it's an important element as it will appear on multiple places across the internet, for instance, when you share a link to your website on the social media. A Tagline is a shorter description of what your website is about. Both elements form a first introduction to the site and give your visitors (and search engines as well) an idea of the site's content and purpose. It is important to think strategically when creating the site's title and tagline. Feel free to use the keywords that you want your site to be associated with on Google. A Site Title and a Tagline should complement each other.
To set up a site title simply write your text in the field under Site Title and press Publish. To set up the tagline just write your text in the respective field and then click on Publish.
Under the option Site icon you can upload an image that can be used as the site's icon (favicon). If you have a logo that you want to use for this purpose - upload an image of 512x512 pixels size. It will normally be visible in browsers as bookmark tabs. Favicon is important for search engine optimization.
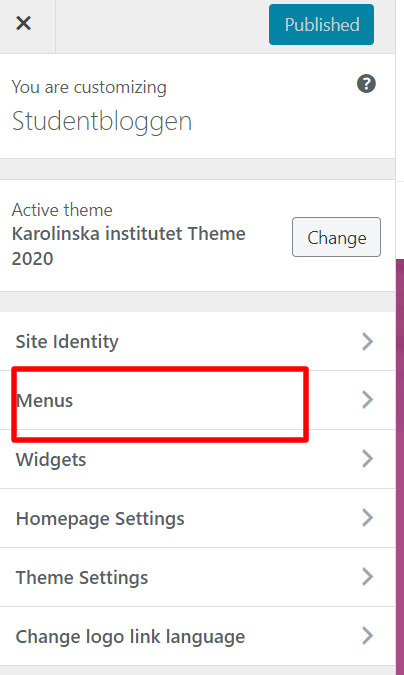
Menus
Site menus allow you to structure the pages and content on your website to make it easier for your visitors to find relevant information. To create a main menu for your site, you first need to create at least two pages. One of them is usually the site's home page. Normally a site menu consists of several pages where some pages can be subordinated to the others and appear as subpages. But that totally depends on your website's purpose, amount of content and the intended navigation path for your users.
To create a site menu, click on 'create a new menu' (Dashboard -> Appearance -> Customize -> Menus). A new window will open, where you need to enter a name for your menu in a respective field and then press Create Menu.
To edit the menu and be able to add more pages to it, klick on: Select a menu to edit while in Menus option and select the menu you want to edit, then press Select.
On the left you see the Pages tab. There you see a list of pages that are available and that you can add to this menu. Remember, you cannot add to a menu pages that are not published (for instance, pages that are in a draft or a private mode). To the right of this tab you will also see a panel ‘Menu settings’. If you check Auto add pages, all pages created in the future will be added automatically to this menu. Display location - if you select Primary menu, the menu is displayed at the top of the home page. Then you get to choose where the menu itself should be visible: whether it should be the site's main (primary) menu (and to be displayed on the website's home page) or whether it should be a regular menu that can be displayed on pages other than the homepage.
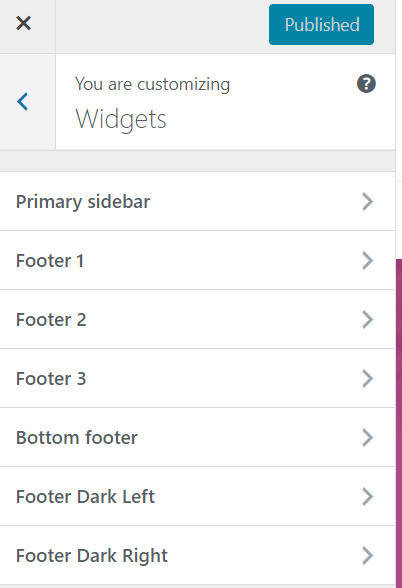
Widgets
The word widgets normally mean interactive elements that create windows or links to different content, such as web pages or social media accounts and more.
There are a few types of widgets available according to our Wordpress template. You can find them under Appearance -> Customize
You can choose where the respective widgets can be displayed on the site. The available options are:
on the site bottom (Footer 1, Footer 2, Footer 3, Footer Dark Right, Footer Dark Left), and in two types of page columns (Primary Sidebar and Blog Intro Sidebar). You need to choose which of these places are suited best for your widgets.
Categories - a widget that includes lists of categories. Categories are a way to structure and split blog posts on your site according to specific themes. Categories are relevant only for blog posts, it is not possible to add link to regular pages to categories.
Recent Posts - is a widget that includes links to recent blog posts. You can decide how many recent posts you want to be displayed under the widget, the number is unlimited. But it is good to consider the user experience perspective and the fact that the page will be much longer to scroll, the more blog posts you want to be displayed.
Social Media widget allows you to display links to accounts in the respective social media channels.
Recent Comments widget displays the latest comments from current posts - in respective places on the website.
The Widget Context tab opens a flexible menu that allows you to customize and edit the existing widgets, create and add new ones.
Create a new page
Go to Pages in the dashboard and click on Add new.Your new page will open in a new window. You can start by typing the page title in Add title field. This title automatically becomes the name of the page and will also appear in the page's URL.
After selecting the title, you can start adding content to the page. You can add content to the page in two ways. If you click on the + symbol below the page title. By doing this, you open an editing tool called Gutenberg. Through the Gutenberg editor you can add different elements, for instance: an image, a block with only text or text and image, a quote, etc.
Further down the page you will also find a field Ingress - here you can enter the intro text to your page. Ingress is not mandatory, but if you fill it in, it will appear below the page title and across all blocks. After creating a page, you can press Preview at the top right - so you can see it in preview mode. If you are ready to publish the page, press Publish.
Under Pages in the dashboard you can see a list of the pages you have created. Quick Edit option allows you to edit certain things, such as page title, without having to open the page.
Create a blog post
Go to the Posts tab in the dashboard and select Add new. You are forwarded to a blank blog page where you need to fill in Add a title first. It is crucial to give your blog post a title, otherwise you won't be able to save the page. After that you can start adding text simply by filling in text in the respective text area, or add images. You can press Publish, when you are ready to publish the page. Or press Preview - to see the blog page in preview mode. Editing options for posts are almost the same as for Pages. But you also have the option to link the post pages to different Categories and tags. All blog posts end up in a list under All posts in the dashboard.
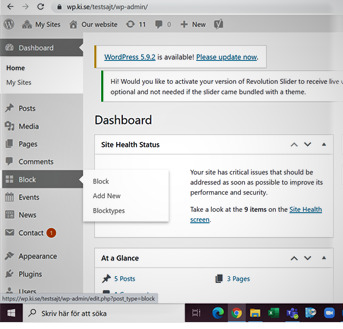
To create a block
Blocks present content, almost like widgets. Go to Block in the dashboard meny, select Add new - then choose a specific block type. A process of creating a block can be slightly different, depending on the block type you choose. All blocks that you create end up under Blocks tab in the dashboard. To add a selected block to a page do the following: when you are on a respective page in edit mode, scroll down until you see Block area. On the left side of the Block area you will see all available blocks. Click on the one you want to add, it will be instantly placed on the right column of the block area. Then press Update at the top of the page.
Different block types
Blocks are content elements, that can contain text and visuals, like images or embedded videos. There are several different block types to choose from in the dashboard meny. To add and edit blocks you need to click on Block
Blog intro
is only relevant if you have previously created posts on your site. This block displays an introduction to the respective post with a picture, relevant blog categories, author and a publication date.
Carousel
A large banner, looks like a slide show. To create it, you need at least one image (dimensions: 1440 width x 670 height). Click on Add image, add a title and a link, if necessary. Then press Publish. A slide show works best with up to 4-5x images.
Carousel top
An identical block as above with the difference that it is placed in the top part of the page.
Logotypes
A block that provides the opportunity to upload logotypes, for example, of partners or sponsors. The logo image should meet the following size requirements: 170 - width, 80 - height. To upload a logo, press Add image. You can also add a link if you want to link the logo to another page.
Media
A block that allows you to embed video content from Youtube.
News and events
The block allows to display news or calendar events. To be able to create this block, first you need to create news or calendar events via the dashboard. News and events are created the same way as pages and posts.
Posts
In this block you can simply display the last three blog posts.
Puff
A block that gives the opportunity to create a series of promos with a headline, image, text and a link. When you create a puff, you can add an overall headline for all three promos, but it is not mandatory. Each promo should also have its own headline. Images and links are not mandatory, but it is recommended to attach one image for each promo, so they look in a uniform way.